3. Scaling Your OCI Web Server

Note: Feb 28, 2020 — I have updated some of the information in this article to match the current version of OCI.
In the first and second installments in this series, I showed you how to register for a free trial version of Oracle Cloud Infrastructure (OCI) and how to create and deploy a simple web server to the cloud. We also configured the instance so that the web server would automatically start when the server was rebooted. In this article, I will show you how to scale that single web server into potentially hundreds of running instances with little effort on your part. We will also learn how to create a load balancer to balance the requests amongst multiple servers.
Please note that this article assumes you have a trial account for OCI and you have already performed all of the steps outlined in the first and second articles. This article builds directly on the work you did in the first two articles.
Scaling in OCI
There are two main types of scaling you can do in OCI, vertical and horizontal. By “vertical” scaling I mean changing the type of virtual machine to a larger, more powerful version. Horizontal scaling is simply adding more servers to a collection of web servers that all have the same deployment characteristics (ie same software loaded on each one). Generally, when you scale horizontally, all of the servers are identical in their computation power. That makes it a little easier to load balance across hundreds of identical servers. However, the OCI load balancers do let you have compute instances of different computational power all in a single pool of servers.
Creating a Custom Image
Now that we have our webserver1 instance configured the way we want it, let’s create a custom image that we will use when we start to scale vertically or horizontally. We will apply that image for each compute instance that will run our web server
Log into your trial account at https://cloud.oracle.com and navigate to your compute instance. Once you can see the detail page for your webserver1 instance, select Create Custom Image from the Actions menu, as shown next.

In the Create Custom Image dialog, name your custom image webserver. Press the blue Create Custom Image button at the bottom of the dialog.

It may take a bit for the image to be created. To see your custom image(s), navigate to Compute -> Custom Images. You will see your webserver instance listed.
Vertical Scaling
Let’s start with an example that will vertically scale our web server. In this scenario, our web server is starting to reach capacity and we simply want to run it on a more powerful server. We will start this process by creating a new, more powerful compute instance, based on our custom image.
Note
You might be tempted to delete the webserver1 instance in order to save some trial credits. Don’t do it! You are limited to 1 instance of each VM shape in your trial. For our purposes will will explore both vertical and horizontal scaling using these restrictions. At the end of this article I’ll show you how to scale back down to minimize your trial credit usage.
Press the blue Create Instance button and we will create our new, larger server. Name the new compute instance webserver2. Select AD 2 as the availability domain (or whatever availability domain applies to your trial instance and is different than the availability domain you used with your webserver1 instance). We want our two web servers in different availability domains

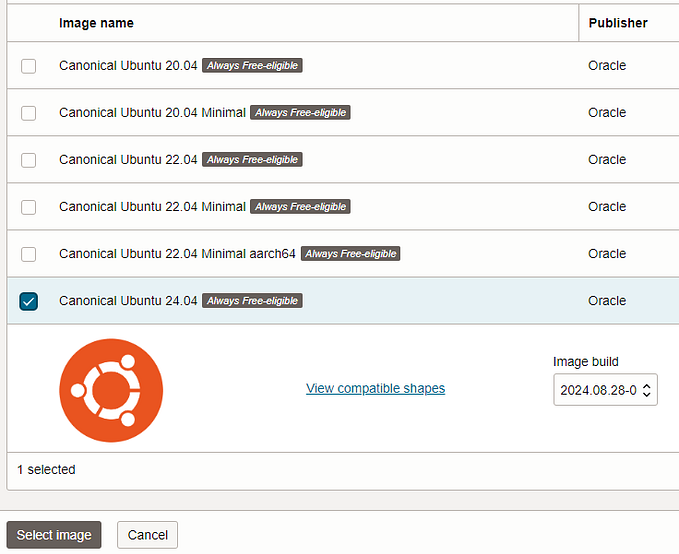
Click the Change Image Source button and select the Custom Images tab. Then check the checkbox next to the webserver custom image and press the blue Select Image button.

Scroll down a bit and select the VM.Standard2.2 shape with 2 OCPU and 30 GB of memory.

After selecting the shape, you need to select the public SSH key, just as you did in the first article for this series. You can accept the defaults for everything else. Once you press the Create button, give the system a little time to fully provision your new web server.
Once the new instance is fully provisioned and running. Make note of the new public IP address for the server. Point your browser to http://<public IP address>:3000 and you should see the Healthy response in your browser. You just doubled the computing power of your web server in a matter of minutes!
Horizontal Scaling
Horizontal scaling is using multiple servers to increase the work capacity of a web site. At the moment we are using the IP addresses of a single web server to serve up the web pages. To scale horizontally, we need to create a load balancer that will present one IP address to the world, but in actuality distribute web calls across the specific web server instances. This is an example of horizontal scaling.
Note:
This is sort of the “hard way” of doing things. Due to limitations of the trial account, we can’t take advantage of instance pools and instance configurations. I’ll write another version of this for people that are running the full OCI instances, but for now, I want to focus on trial instances.
There are two steps needs to create a working load balancer for these two instances.
- Create the Load Balancer (with Listener)
- Define a Backend Set
Create the Load Balancer
To create the load balancer, use the menu system to navigate to Networking -> Load Balancers and press the blue Create Load Balancer button. Name the load balancer webserverLB and ensure that it is set as a Public load balancer. Select the Small option for the bandwidth.
Scroll down a bit and select your VCN and then public subnet for the load balancer.

Note: The names of the VCNs and web servers have changed a bit in this article from when I first wrote it. Please ensure you use the correct VCN and a public subnet when creating your load balancer.
Press the blue Next button to move to the next step in the wizard. Select the Weighted Round Robin policy (we’ll use the weights later to account for the fact that one of our compute instances is twice the capacity of the other).

Press the blue Add Backends button. Select your 2 compute instances that are running your web server. Your instance names will vary from the ones shown here. Click the Add Selected Backends button when you are ready.

Set the Port field to 3000. Press the blue Next button.
In the final step, select the HTTP option for the listener. The port will automatically change to 80. Change the port to 3000. Finally, press the blue Submit button to start the creation process. It may take a while for the load balancer creation to complete. Wait until it shows as green on your dashboard.
Next you’ll see an example of the load balancer in your dashboard. Take a look at the IP Address (partially redacted in my image below) and ensure that it says Public to the right of the IP address. This is the IP address that you will later use to test the load balancer.

This loads balancer will be the public face of our web servers. All HTTP requests to our server will be routed via this load balancer. If we also needed to support HTTPS we would have to create a second load balancer for that protocol.
Testing Our Load Balancer
Testing the load balancer is quite easy. Simply open your browser and point it to:
http://<load balancer IP address>:3000You should see the response Healthy in your browser window. Press the Refresh button on your browser 5 or 6 more times to drive a small amount of traffic to the load balancer.
Now let’s SSH into each of our compute instances. Open one SSH console for each compute instance and enter the following commands:
cd /var/log
sudo cat messages
If you take a look at the output at the end of the file on each compute instance you will see the log entry for Hello World invoked… You can see this output “live” by using the command:
sudo tail -f messagesNow open your browser to http://<load balancer IP.:3000/greeting and hit the refresh button 5 times or so. Watching the two SSH consoles get updated as traffic is routed to each one.
In Closing
As you can see, setting up a load balancer in a trial environment is pretty quick and simple. It’s easy to create and manage. Outside of a trial environment, there are additional management tools that you can use to quickly scale your environment by adding (or removing) additional servers, setting traffic limits etc. It’s a flexible and robust system.
Note:
Do not delete these new resources (the load balancer and the 2nd compute instance) if you want to continue onto the next article in this series on adding HTTPS support.
If you have no intention of continuing onto the next article in this series, you can be frugal and delete the load balancer and all of is sub-components (ie the backend set and listener). You can also delete the webserver2 instance. You can delete these assets by selecting the Terminate option for each one, starting with the load balancer.

Follow a similar process to delete the webserver2 instance.

I hope you enjoyed this article. In the future we will learn how to expand the capabilities of our web server by adding a HTTPS support, authenticating users using the built-in Identity Cloud Service (IDCS), connecting to a database, looking at various storage options and more.